You are here

Fiberglass Ammunition

Error message

  • Deprecated function: The each() function is deprecated. This message will be suppressed on further calls in _menu_load_objects() (line 569 of /home1/elizabet/public_html/havenholde/35footspear/includes/menu.inc).
  • Notice: Trying to access array offset on value of type int in element_children() (line 6398 of /home1/elizabet/public_html/havenholde/35footspear/includes/common.inc).
  • Notice: Trying to access array offset on value of type int in element_children() (line 6398 of /home1/elizabet/public_html/havenholde/35footspear/includes/common.inc).
  • Notice: Trying to access array offset on value of type int in element_children() (line 6398 of /home1/elizabet/public_html/havenholde/35footspear/includes/common.inc).
  • Notice: Trying to access array offset on value of type int in element_children() (line 6398 of /home1/elizabet/public_html/havenholde/35footspear/includes/common.inc).
  • Notice: Trying to access array offset on value of type int in element_children() (line 6398 of /home1/elizabet/public_html/havenholde/35footspear/includes/common.inc).
  • Notice: Trying to access array offset on value of type int in element_children() (line 6398 of /home1/elizabet/public_html/havenholde/35footspear/includes/common.inc).
  • Notice: Trying to access array offset on value of type int in element_children() (line 6398 of /home1/elizabet/public_html/havenholde/35footspear/includes/common.inc).
  • Deprecated function: implode(): Passing glue string after array is deprecated. Swap the parameters in drupal_get_feeds() (line 394 of /home1/elizabet/public_html/havenholde/35footspear/includes/common.inc).

Fiberglass-Shafted Ammunition Inspection Standards


Every piece of ammunition must be checked for all standards. 

See the Ammunition Standards and Ammunition Construction Standards Sections for additional details. 

See Appendix B: Fiberglass Inspection Standards for suggestions on the process of inspecting ammunition. 
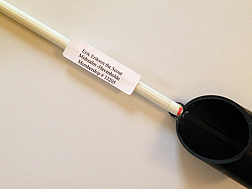
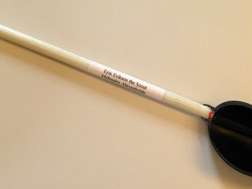
Label

The label must be printed (not hand written) with the owner’s name and Kingdom

The label must be in English, utilizing a legible/readable font. 

The label must be completely covered with clear packing tape.  No reinforced or strapping tape may be used to cover the label.

If the combat archery ammunition is group-owned/labeled ammunition, an individual’s name as a point of contact for within the group must also be on the label. 

Fletching, Colors, Markings and Length

NO fletching is permitted on fiberglass shaft ammunition.  (Note- APDs are not considered fletching.) 

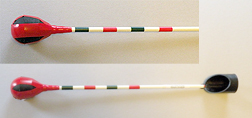
Ammunition may not be more than 10% yellow.

NOTE: 6 inches of alternating red and green stripes are only for experimental weapons. 

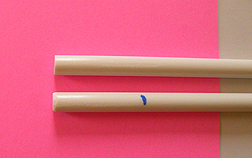
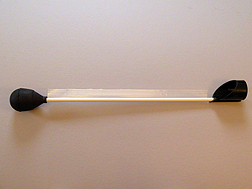
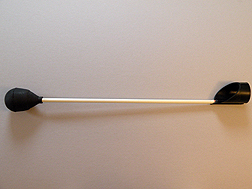
All ammunition has a maximum length of 28 inches from the back of the head to the point where the string touches the back of the ammunition.  
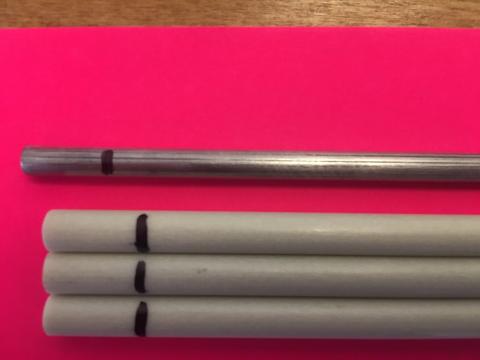
Shaft

Shafts must be solid pultruded fiberglass.  (~Soc) 

Shaft size must be ¼ inch diameter. 

The shaft must be structurally sound.  When bent gently, there should be no cracking sounds or odd deformations. 
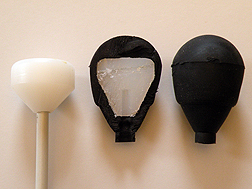
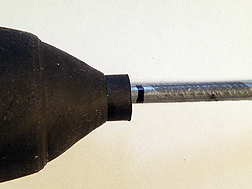
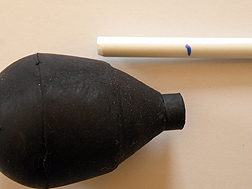
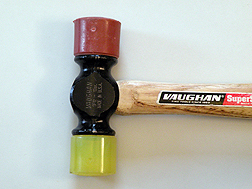
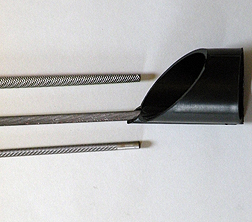
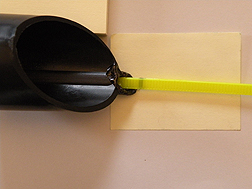
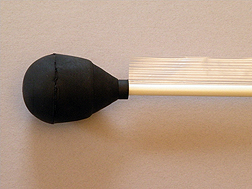
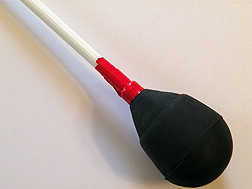
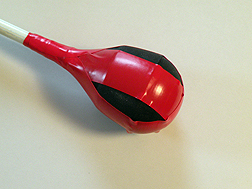
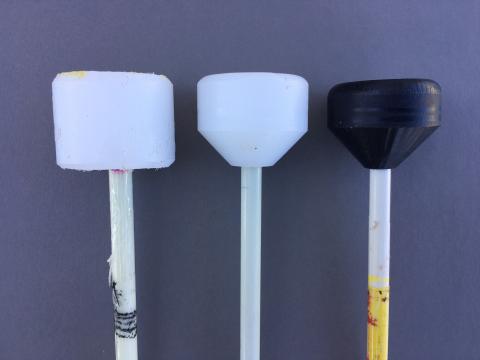
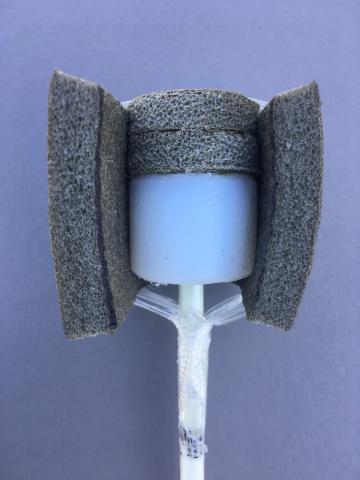
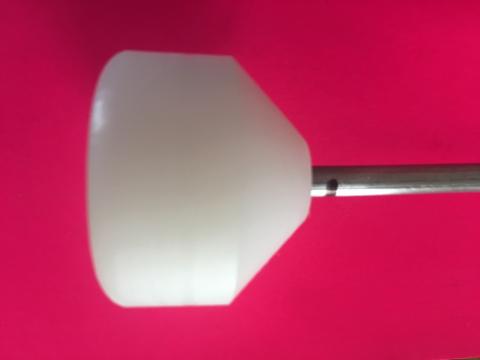
Head and APD

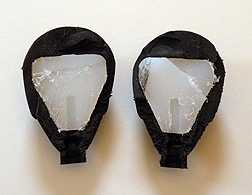
The head must be a Fathead.  There must be two seams to show that it was made from a 3-piece mold. 

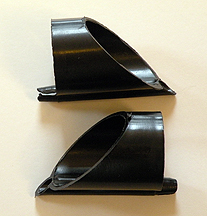
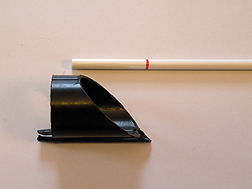
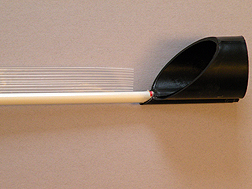
The APD (Anti-Penetration Device) must be an Asgard. 

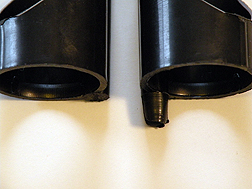
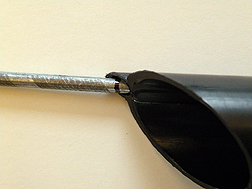
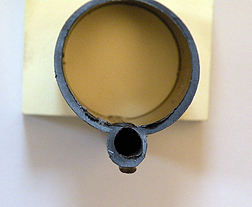
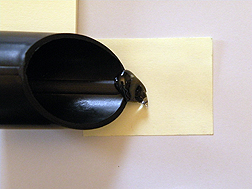
No cracks, cuts, or missing pieces are allowed in either the Head or the APD.  (Check the APD inside and out, especially along both sides of the shaft tube.) 

The fiberglass shaft cannot show through or stick through the end of the APD. 

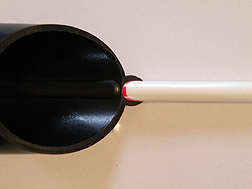
The APD must be round (the archer may fix this). 

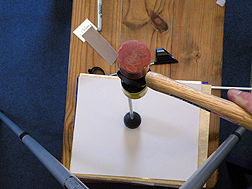
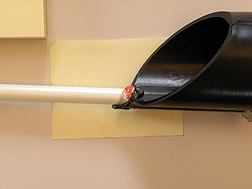
The head and APD must be secure.

  1. Gripping the head and APD with ONLY the thumb and two fingers, gently pull then gently twist.
  2. NO movement is allowed.
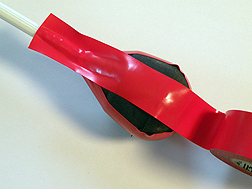
  3. Wrinkling of the red tape wraps around the base of the head and the point of the APD make it clear when there is movement.
  4. NOTE- This test is to determine if the head or APD is already loose, NOT to see if it can be broken loose. 

Tape and Taping

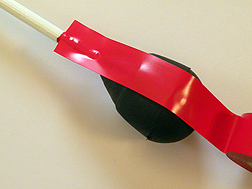
A single piece of filament-reinforced strapping tape must be used to cover the shaft from the back of the head to the front of the APD.  It must run lengthwise on the shaft. 

After taping the shaft, the head must be secured to the shaft with either strapping tape or red electrical tape.  (See the Constructions Standards for details.) 

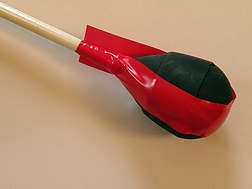
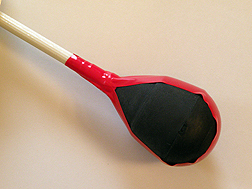
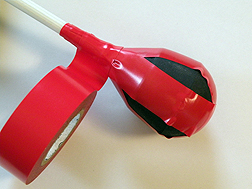
There must be two pieces of tape crossing over the tip. Both pieces must be structurally sound.  (No cracks more than halfway across and no longitudinal cracks.) 

Crossover pieces must be either strapping tape OR electrical tape, not both. 

NOTE- Ammunition made before January 2012 may have been made with red electrical tape on top of strapping tape.  Ammunition with this taping will fail inspection after January 1, 2017. 

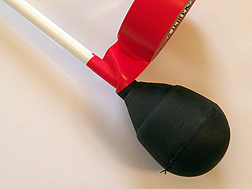
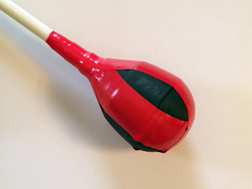
A piece of ¾ inch wide red electrical tape must be wrapped around the junction of the base of the head and the shaft.

The head can not be completely covered with tape. 

A small square of red duct tape on the tip to protect the crossover pieces is acceptable. 

After taping the shaft, the APD must have a wrap of ¾ inch red electrical tape around the angled point of the shaft. 


Tutorial on Making Fiberglass Ammo with Fathead and Fathead 2 blunts


The idea behind the Fathead was to take a UHMW (Ultra-High Molecular Weight Polyethylene) core and mold approved padding around it to bring the over all dimensions up to the Society Standard.


The new Fathead 2 Blunt produced by Northstar has been approved for use by the  Midrealm approved.


The Fathead has been cut in half showing the padding and the UHMW core and the shaft hole the fiberglass shaft will go into. There is no way a fiberglass shaft will punch through the core.

The width of the UHMW core on the striking surface is 1 1/4 inch. Even if the rubber padding on the striking edge fails the 1 1/4 core should not pentrate through the face bars of a legal helmet.


The Asgard APDs (Anti Penetration Devices) produced by Baldar is the only approved Midrealm (Anti Penetration Device). The photo shows the APD from both sides. One end has an opening for the fiberglass shaft to go into while the other end has a built in arrow knock for use with a handbow.


    Cut off the nock on the back of the APD and sand flat if you are using it on a crossbow, left photo

    Leave the nock on the back of the APD if you are using them on a bow, right photo


      A small weep hole (1/16) must be drilled in the back part of the APD shaft hole to allow excess air and glue to escape. As you are holding it with the fiberglass shaft hole facing forward and the shaft ridge is facing down, drill the hole on the left side in the shown location.


      Prepare the fiberglass shaft for use.  Cut to length, lightly sand 1 1/2 inches of the shaft ends with medium grit sandpaper and wipe down with acetone.


      The end of the shaft going into the Fathead need the edge of the end very slightly rounded / tapered just enough to take the edge of the collar off the shaft. This will aid the 1/4 inch shaft from going into the 1/4 end hole in the UHMW core in the Fathead.

      The marked shaft has the collar end going into the Fathead slightly rounded.

      CAUTION: Be careful in any process involving cutting, sanding or cleaning the fiberglass shafts. Fiberglass dust can be an irritant to the skin and eyes.


      Use Acetone (any brand) to clean the shaft after cutting and sanding.


      CAUTION: Read all warnings on the product can involving health, inhalation and fire hazards.

      Inspect the head's shaft hole to ensure that it doesn't have any stray rubber from the molding process, if so, clean it out.  (A round file, a drill bit held in your hand, or similar tools work well) 

      Measure the distance from the collar of the Asgard collar of the Fathead Blunt into the shaft hole until it bottoms out.  I use a slightly less than 1/4 inch rod and mark the initial mark onto the rod. The rod was pulled out from where it bottom out for this picture.

      Mark this distance on your fiberglass shaft.  It is critical that the shaft bottoms completely out into the Fathead shaft hole.  Repeat this process for each Fathead blunt and shaft.  This distance will be approximately 1 1/8 inch plus. 


      Use the rod you marked showing the depth of the Fathead shaft hole to mark the distance on the fiberglass shaft.


      You will need a hammer that has a hard rubber, hard plastic or rawhide head. If you use a metal head hammer you may damage the end of the shaft you are hitting on.

      You need to ensure that you protect the fiberglass end you are pounding on from damage during this process. This will be the end you are putting the Asgard APD onto later.


      Inside the Fathead blunt is a UHMW core.  UNHM is short for Ultra High Molecular Weight.  It is a very dense plastic and has a 1/4" diameter hole into which you need to insert your 1/4 inch diameter shaft. The holes are exactly the right size.

      Place the end of the fiberglass shaft that you tapered/rounded into the blunt shaft hole.

      The blunt should be place on a hard surface suitable for hammering.  Pound with a hammer on the other end of the shaft until the shaft reference line you marked is even or just inside the collar of the blunt.

      One hand should be at the blunt end holding the fiberglass shaft as straight as possible going into the blunt. The other end will be hammering the shaft into the blunt. One person can do this process for bolts because they aren't as long as arrows. If you are making arrows you may need another person to help you hold the shaft and give it some support.


        The shaft hole of the APDs must be roughened up for better adhesion of the adhesive.  Be sure to clean the shaft hole out afterwards.


        If you use a file to roughen up the inside of the shaft hole, be sure that the circumference is uniform the entire length of the file.  The top file is tapered and starts small and becomes wider as it goes up.  Using this type of file can cause excessive material to be removed wreaking the APD. 


        Measure the distance from the collar of the Asgard into the shaft hole until it bottoms out.  I use a slightly less than 1/4 inch rod and mark the initial mark onto the rod. The rod was pulled out from where it bottom out for this picture.

        Mark this distance on your fiberglass shaft.  It is critical that the shaft bottoms completely out into the APD shaft hole.  Repeat this process for each APD and shaft.  This distance will be approximately 1 3/4 inch plus. 


        Use the rod you marked showing the depth of the Asgard APD shaft hole to mark the distance on the fiberglass shaft.


        The only adhesive approved for securing either the Fathead Blunt or the Asgard APD onto the fiberglass shaft is either Plumbing GOOP or Marine GOOP adhesive.


        This view shows the shaft hole of the Asgard APD


        Put a generous amount of GOOP adhesive over the shaft hole of the APD.    The Asgard fits the 1/4 inch diameter shafts very snugly.  So snugly, that the shaft will push all the glue to the bottom of the shaft hole.  You must push the shaft in hard enough and twist to get the glue to distribute between the shaft and the APD the length of the shaft hole.


          You can use the end of a strap-lock to push some of the adhesive around the inside of the shaft hole wall. Then you add more to the opening.


          The Asgard fits the 1/4 inch diameter shafts very snugly.  So snugly, that the shaft will push all the glue to the bottom of the shaft hole.  You must push the shaft in hard enough and twist to get the glue to distribute between the shaft and the APD the length of the shaft hole.


          Push the APD onto the shaft until it touches the bottom of the hole and the glue oozes or spurts out the APD hole and weep hole at the other end.


          Push the APD onto the shaft until it touches the bottom of the hole and the glue oozes or spurts out the APD weep hole at the other end.


          The first couple of times you will proably put to much glue in and have more to clean up. To much is always better than not enough to do the job.


          Wipe off t:he excess Plumbers GOOP from the shaft opening and the weep hole. Make sure you can see your reference line. You may have to remark it on the shaft because the glue will cause it to fade.

          IMPORTANT: After gluing, let the shaft and APD set for at least seven days without moving it in a temperature controlled environment (the room temperature is comfortable for you to be in it).    Longer cure time is always better than trying to do this process to quickly. The adhesive needs to cure slowly to be stronger.  If you short cut this step you APD may not pass inspection because it will be loose or become loose quicker with use.


          The entire length and width of the fiberglass shaft must be covered from behind the blunt, to the front of the Anti-Penetration Device (APD), with fiberglass-reinforced tape (strapping tape). 

           Electrical tape is NOT to be used for this application.  

          Roll the shaft a little and then push down the tape lengthwise.  Do this in increments.  Each time you push down thon the tape, you will stick a little bit more of the tape on the shaft.  Roll the shaft, push down on the tape lengthwise, roll the shaft, push on the tape, roll tape….


          Cut a piece of tape the needed length.   Length will depend on whether you are making arrows or bolts and the length of the shafts.


          Lay one long edge of the tape carefully lengthwise down the shaft.  Get that one edge of tape, the long edge, stuck on the shaft straight before proceeding.  


          Roll the shaft a little and then push down the tape lengthwise.  Do this in increments.  Each time you push down thon the tape, you will stick a little bit more of the tape on the shaft.  Roll the shaft, push down on the tape lengthwise, roll the shaft, push on the tape, roll tape….


          The tape job on the finished shaft should be smooth and will be the more experience and practice you get.


          Caution: There is a trick to using electrical tape.  You need to have gentle pressure to stretch the tape but not enough to over stretch it. 

          Use a good grade of Red 3⁄4 inch electrical tape to tape the Flathead onto the fiberglass shaft. 

          Using a continual piece of 3⁄4 inch RED electrical tape start right below the Fathead Blunt collar and do a complete wrap around the shaft stretching it slightly


          After the first wrap around start a slight spiral going from the shaft and onto the collar of the blunt using the same stretching it slightly technique.


          There is a ridge/collar up from the end of the blunt.  Use this as the reference line in which you don’t go above it, but do tape around it at least a full turn then cut the tape.


          What the first step of the taping will look like when you are done.


          Start a piece of crossover tap (at least 1/2 inch fiberglass-reinforced tape or 3/4 inch of red electrical tape) at the bottom edge of the tape you used for the first tape wrap around the shaft.


          Take the at least 1/2 inch fiberglass-reinforced tape or 3/4 inch of red electrical tape up from the bottom, over the top and down the other side to the same reference point.  You will fold one side of the bottom section of the tape edge of the crossover tape onto the shaft.  The photo shows one side done and the other ready to be done.


          This is how the first piece of crossover tape will look like if you use 3/4 of an inch red electrical tape.


          Repeat the process to put on your second piece of crossover tape.


          This is how the second piece of crossover tape will look like upon completion if you use the 3/4 of an inch red electrical tape.


          Take a piece of red electrical tape and do a wrap around the junction of the fiberglass shaft into the blunt. Do two tight wraps with the tape with one half the width on the shaft and the other one half of the tape width on the collar of the blunt.


          You will do two tight wraps with the red electrical tape being one half on the shaft and the other one half on the collar of the blunt.


          All combat archery ammunition must have the owner’s name and Kingdom displayed clearly on a printed label in English covered with clear tape on the shaft. If it is group ammunition, the group name must be used as the owner’s name

          Put your printed label or required information about 1 inch down from the APD on the top of fiberglass shaft.

          Note: The Avery White Return Address Labels 5267 are 1/2 inches by 1 3/4 inches work well.


          Shot showing the printed label wrapped around the shaft, covered with clear tape that wraps completley around the shaft to protect the label.


          For those of you who made this style of combat arrow or bolt during the experimental testing, not to fear. Remove the tape and you can still use them outside the Middle Kingdom.


          Tutorial on Making Fiberglass Ammo with UHMW (Ultra High Molecular Weight Head)


          Examples of UHMW (Ultra-High Molecular Weight Polyethylene) core sometimes called LuShan by brand name.

          1. UHMW blunts are constructed of at least 1.25 inches diameter UHMW rod with a hole drilled in it to accept the shaft.
          2. The shaft hole must be at least .5 inch deep, and there must be at least .5 inch of UHMW in front of the shaft.
          3. The front edges of the blunt must be rounded over.


          1. At least .5 inch and at most 1.25 inch of resilient padding after taping must be added in front of the blunt and be at least the same diameter as the blunt.
          2. The head must have a side-wrap of foam that extends from the tip of the padding to at least .5 inch over the UHMW that brings the total diameter of the head to at least 1.5 inch after taping.  The side wrap must cover the entire length of the blunt that is 1.25 inches in diameter.  
           

          Inspect the UHMW head's shaft hole to ensure that it doesn't have any stray material from the molding process, if so, clean it out.  (A round file, a drill bit held in your hand, or similar tools work well) 

          Mark a rod 1/2 inch from the end.  Insert the rod into the UHMW head until it bottoms out.  It should bottom out at the 1/2 inch mark on your rod.  The hole depth can be more than 1/2 inch, just not less. I use a slightly less than 1/4 inch rod. 

          The rod was pulled out from where it bottom out for this picture.

          Check all your heads for the proper depth.  


          Using the depth gauge you used on the UHMW head, mark the end of each bolt/arrow shaft 1/2 inch in from the end.  Again, it can be more than 1/2 inch, just not less.  

          Note:  If you buy a from North Star Archery one end of the shaft is slightly beveled, the other end is cut square.  The beveled end in the end you want to put into the UHMW head.

          CAUTION: Be careful in any process involving cutting, sanding or cleaning the fiberglass shafts. Fiberglass dust can be an irritant to the skin and eyes.


          You will need a hammer that has a hard rubber, hard plastic or rawhide head. If you use a metal head hammer you may damage the end of the shaft you are hitting on.

          You need to ensure that you protect the fiberglass end you are pounding on from damage during this process. This will be the end you are putting the Asgard APD onto later.


          The Ultra - High Molecular Weight (UHMW) core is very dense plastic and has a 1/4"  diameter hole into which you need to insert the 1/4 " diamenter shaft.  The hole is exactly the right size and he shaft must be hamered in.  

          Place the end of the fiberglass shaft that you tapered/rounded into the blunt shaft hole.

          The blunt should be place on a hard surface suitable for hammering.  Pound with a hammer on the other end of the shaft until the shaft reference line you marked is even or just inside the collar of the blunt.  A rubber, plastic or rawhide hammer will not damage the shaft end you are hammering on as much.

          One hand should be at the blunt end holding the fiberglass shaft as straight as possible going into the blunt. The other end will be hammering the shaft into the blunt. One person can do this process for bolts because they aren't as long as arrows. If you are making arrows you may need another person to help you hold the shaft and give it some support.


          The Asgard APDs (Anti Penetration Devices)  is the only approved Midrealm (Anti Penetration Device). The photo shows the APD from both sides. One end has an opening for the fiberglass shaft to go into while the other end has a built in arrow knock for use with a handbow.


          Cut off the nock on the back of the APD and sand flat if you are using it on a crossbow, left photo


          Leave the nock on the back of the APD if you are using them on a bow, right photo


          A small weep hole (1/16) must be drilled in the back part of the APD shaft hole to allow excess air and glue to escape. As you are holding it with the fiberglass shaft hole facing forward and the shaft ridge is facing down, drill the hole on the left side in the shown location.


          Measure the distance from the collar of the Asgard into the shaft hole until it bottoms out.  I use a slightly less than 1/4 inch rod and mark the initial mark onto the rod. The rod was pulled out from where it bottom out for this picture.

          Mark this distance on your fiberglass shaft.  It is critical that the shaft bottoms completely out into the APD shaft hole.  Repeat this process for each APD and shaft.  This distance will be approximately 1 3/4 inch plus. 


          Use the rod you marked showing the depth of the Asgard APD shaft hole to mark the distance on the fiberglass shaft.


          The shaft hole of the APDs must be roughened up for better adhesion of the adhesive.  Be sure to clean the shaft hole out afterwards.


          If you use a file to roughen up the inside of the shaft hole, be sure that the circumference is uniform the entire length of the file.  The top file is tapered and starts small and becomes wider as it goes up.  Using this type of file can cause excessive material to be removed wreaking the APD. 


            Prepare the fiberglass shaft for use.  Cut to length, lightly sand 1 1/2 inches of the shaft ends with medium grit sandpaper and wipe down with acetone.


              Use Acetone (any brand) to clean the shaft after cutting and sanding.

              CAUTION: Read all warnings on the product can involving health, inhalation and fire hazards.


              The adhesive approved for securing either the Fathead Blunt or the Asgard APD onto the fiberglass shaft is either Plumbing GOOP or Marine GOOP adhesive.  This adhesive is recommended by the manafacturer.


              After gluing, let it set for seven (7) days without moving it.  


              This view shows the shaft hole of the Asgard APD


              Put a generous amount of GOOP adhesive over the shaft hole of the APD.    The Asgard fits the 1/4 inch diameter shafts very snugly.  So snugly, that the shaft will push all the glue to the bottom of the shaft hole.  You must push the shaft in hard enough and twist to get the glue to distribute between the shaft and the APD the length of the shaft hole.


              You can use the end of a strap-lock to push some of the adhesive around the inside of the shaft hole wall. Then you add more to the opening.


              Push the APD onto the shaft until it touches the bottom of the hole and the glue oozes or spurts out the APD weep hole at the other end.


              The first couple of times you will proably put to much glue in and have more to clean up. To much is always better than not enough to do the job.


              Wipe off t:he excess Plumbers GOOP from the shaft opening and the weep hole. Make sure you can see your reference line. You may have to remark it on the shaft because the glue will cause it to fade.

              IMPORTANT: After gluing, let the shaft and APD set for at least seven days without moving it in a temperature controlled environment (the room temperature is comfortable for you to be in it).    Longer cure time is always better than trying to do this process to quickly. The adhesive needs to cure slowly to be stronger.  If you short cut this step you APD may not pass inspection because it will be loose or become loose quicker with use.


              The entire length and width of the fiberglass shaft must be covered from behind the blunt, to the front of the Anti-Penetration Device (APD), with fiberglass-reinforced tape (strapping tape). 

               Electrical tape is NOT to be used for this application.  

              Roll the shaft a little and then push down the tape lengthwise.  Do this in increments.  Each time you push down thon the tape, you will stick a little bit more of the tape on the shaft.  Roll the shaft, push down on the tape lengthwise, roll the shaft, push on the tape, roll tape….


              Cut a piece of tape the needed length.   Length will depend on whether you are making arrows or bolts and the length of the shafts.


              Lay one long edge of the tape carefully lengthwise down the shaft.  Get that one edge of tape, the long edge, stuck on the shaft straight before proceeding.  


              Roll the shaft a little and then push down the tape lengthwise.  Do this in increments.  Each time you push down thon the tape, you will stick a little bit more of the tape on the shaft.  Roll the shaft, push down on the tape lengthwise, roll the shaft, push on the tape, roll tape….


              The tape job on the finished shaft should be smooth and will be the more experience and practice you get.


              All combat archery ammunition must have the owner’s name and Kingdom displayed clearly on a printed label in English covered with clear tape on the shaft. If it is group ammunition, the group name must be used as the owner’s name

              Put your printed label or required information about 1 inch down from the APD on the top of fiberglass shaft.

              Note: The Avery White Return Address Labels 5267 are 1/2 inches by 1 3/4 inches work well.


              Shot showing the printed label wrapped around the shaft, covered with clear tape that wraps completley around the shaft to protect the label.


              Caution: There is a trick to using electrical tape.  You need to have gentle pressure to stretch the tape but not enough to over stretch it. 

              Use a good grade of Red 3⁄4 inch electrical tape to tape the Flathead onto the fiberglass shaft. 

              Using a continual piece of 3⁄4 inch RED electrical tape start right below the Fathead Blunt collar and do a complete wrap around the shaft stretching it slightly


              After the first wrap around start a slight spiral going from the shaft and onto the collar of the blunt using the same stretching it slightly technique.


              There is a ridge/collar up from the end of the blunt.  Use this as the reference line in which you don’t go above it, but do tape around it at least a full turn then cut the tape.


              What the first step of the taping will look like when you are done.


              Start a piece of crossover tap (at least 1/2 inch fiberglass-reinforced tape or 3/4 inch of red electrical tape) at the bottom edge of the tape you used for the first tape wrap around the shaft.


              Take the at least 1/2 inch fiberglass-reinforced tape or 3/4 inch of red electrical tape up from the bottom, over the top and down the other side to the same reference point.  You will fold one side of the bottom section of the tape edge of the crossover tape onto the shaft.  The photo shows one side done and the other ready to be done.


              This is how the first piece of crossover tape will look like if you use 3/4 of an inch red electrical tape.


              Repeat the process to put on your second piece of crossover tape.


              This is how the second piece of crossover tape will look like upon completion if you use the 3/4 of an inch red electrical tape.


              Take a piece of red electrical tape and do a wrap around the junction of the fiberglass shaft into the blunt. Do two tight wraps with the tape with one half the width on the shaft and the other one half of the tape width on the collar of the blunt.


              You will do two tight wraps with the red electrical tape being one half on the shaft and the other one half on the collar of the blunt.


              For those of you who made this style of combat arrow or bolt during the experimental testing, not to fear. Remove the tape and you can still use them outside the Middle Kingdom.


              Subscribe to Fiberglass Ammunition